Hangiri
(or Sushi Oke or Handai)
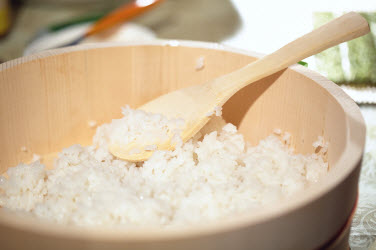
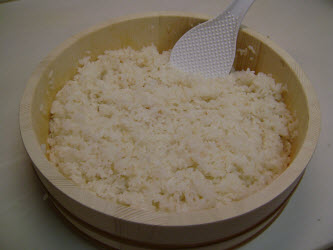
A Hangiri (or sushi oke) is a traditional Japanese wooden tub that is used in the final steps of preparing sushi rice.
Its wide flat bottom aids in spreading out the hot rice to help it cool quickly after pouring in the sushi seasoning while simultaneously fanning and mixing the rice with a rice paddle.
This helps to give the sushi rice a slightly shiny appearance and speeds up evaporation and absorption so the rice doesn't get mushy.
A quality one is normally made of uncoated cypress wood or cedar and is bound by two copper bands.
They can come in sizes ranging from 1 foot to 3 feet, but the "sweet spot" for general home use is probably 16 inches in diameter and 4 inches high. This size is good for 10 to 12 cups of rice.
A good Hangiri can be expensive. One that is around 1 foot should cost at least $75.00. The best ones are made out of cypress or cedar, are bound by real copper bands and are made in Japan.
If the one you are looking at is less than $50.00 then it is probably a cheap knock-off that is made out of pine with "copper" bands that are actually made of plastic. You will be replacing this one in a year or two if you make sushi rice of any kind on a regular basis.
The cost of an authentic hangiri is definitely worth the price if you are more than an occasional sushi rice maker.
How to Season your Hangiri and Prepare it for use each time
Before using your it for the first time...
Think of seasoning your Hangiri as being similar to seasoning your cast iron skillet; except you use water and rice vinegar instead of bacon grease or lard. It is also necessary if you want to do everything properly and treat it right from the very beginning.
To season, fill it with water and 1/4 cup of rice vinegar and let it sit overnight. The next day pour the water out and dry it well before putting it up.
Before using it each time to make Sushi Rice
Fill the hangiri with water and let it sit while your rice cooks or for at least 30 minutes before you plan to use it. Make sure to pour out the all of the water before putting any hot rice in it. It is probably a good idea to turn it over to drain for a few minutes so there won't be so much water in it that the rice can soak it up and get mushy.
Since most quality ones are made of untreated cypress, if rice were put in it without first soaking it in water the rice would stick to the wood. The water has a non-stick affect on the wood and also keeps the tub from soaking up too much of the rice vinegar, sugar, and salt mixture.
While you're soaking the tub, do like the pros do and soak your wooden rice paddle and 2 or 3 kitchen towels too (one to cover your sushi rice later and one to keep by your side to use as you make your sushi rice). Be sure to use clean, used, lint-free towels with no odor so no smells or scents will get transferred to your sushi rice.
After use, wash and dry your sushi oke thoroughly
If there is rice stuck to it when you get done, then put warm water in it and let it sit for a while. It is ok to use a sponge or brush to remove stubborn spots, but don't use any kind of steel or wire brush; it will damage the wood.
After washing, dry thoroughly with a towel and then turn it upside down in the dish drainer or prop it on the side of a bowl to get air flow underneath. The last thing you want is to put the hangiri up while it is still wet and for it to develop mold spots. And don't dry the tub in the sun, it may warp.
If seasoned and cleaned thoroughly after each use, a good quality hangiri will give you many, many years of faithful service.
How to Use your Hangiri
The following was taken from our sushi rice recipe page but I copied it here for your convenience. I picked up where you make the sushi seasoning for your sushi rice.
Make your Sushi Seasoning
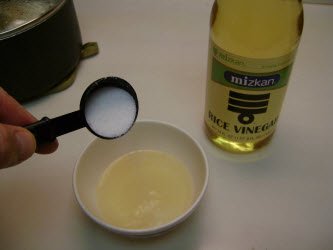
8. Mix together the 4 Tbsp rice vinegar, 5 Tbsp sugar (down to 2 Tbsp on occasion) and 1/2 tsp salt (up to 1 tsp salt on occasion) in a small bowl.
You can microwave it a little to help you get the sugar to dissolve if you need to (Mom doesn't agree so she doesn't microwave it though...she just keeps mixing till it dissolves...)
When and why you may want to vary the Sugar and Salt measurements above on occasion...
5 tablespoons is what my mother normally uses, recommends and swears by... a lot of other sushi rice recipes always only use 2 tablespoons.
Here is why she normally uses 5:
My mother says she has had talks with many 1st class
Japanese sushi chefs over the years (in Japan) and although they were
hesitant to reveal the "secret" to their sushi rice recipe many did
reveal hints; one of which she soon noticed became somewhat of a common
thread --- that they preferred to make theirs a bit "sweeter".
With that said, let's discuss when you may want to vary the sugar and salt measurements above (which does lean toward the sweeter side).
In most cases, I make my sushi seasoning just as stated above. It is good in most types of sushi especially chirashizushi, futomaki, most makizushi (rolls) and those recipes using milder flavors and meats.
For Nigirizushi (oblong pad of rice with a topping across the top) and stronger meats and flavors you may want to consider a little less sweet and a little more salt.
Here is what I would suggest:
1. The first time you make this sushi seasoning follow the recipe above using:
- 4 Tbsp rice vinegar
- 1/2 tsp salt and
- 5 Tbsp sugar
2. The next time, try (to me) the opposite end of the extreme which is:
- 4 Tbsp rice vinegar
- 1 tsp salt and
- 2 Tbsp sugar. (not as sweet and a little saltier)
Decide which you like better, or what you like better depending on what type of sushi you are making.
Or experiment and vary your preference between the 2 extremes above until you find your sweet spot.
This is the real test when you are making sushi rice at home... adjust the flavors according to what you are making or to what you like.
Ok. Back on track...
Mixing the Sushi Seasoning with your Rice
10. Next dump the hot rice into a very large bowl or preferably in a traditional wooden sushi tub called a hangiri. It is also referred to as an sushi oki. If using a bowl instead, put a damp towel under it to keep it from sliding.
*** And as a side note, don't try to scrape the harder rice up that may be stuck to the bottom of the pot. Leave it in the pot if it is stuck or hard or "crispy". These harder pieces will not be good in your sushi rice ***
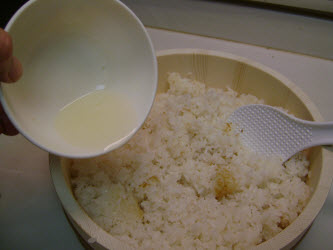
11. Spread the rice out and pour the vinegar mixture all over the rice. The brown spot in the picture is not burnt rice, but rather where the kombu laid on the rice it left a brownish stain.
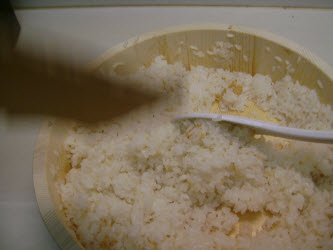
12. Now, if you have an electric fan, point it down over the rice from your right or left side so that it blows over the rice. Try to mix the rice using a side to side cutting motion with the edge of your wooden or plastic rice paddle.
What you are trying to do is coat each grain of rice and cool it quickly at the same time without mashing the grains of rice. All of this helps to evaporate the liquid faster which gives the rice a nice shine and also helps prevent mushiness.
13. If you don't have an electric fan, then use a hand fan or a piece of cardboard (as in the picture) in one hand while using the mixing motion described above with your other hand. Its a bit trickier since you can't use one hand to hold the bowl or hangiri in place, but you'll quickly get the hang of it.
14. You can stop mixing when everything has been absorbed and is no longer wet and slippery, the rice is fluffy and each grain is very shiny.
15. Cool to room temperature before using to make your sushi. You can cover the Hangiri with a damp tea towel or damp cloth while it is cooling to keep the rice from drying out.
And there you have it!
After you get done making makizushi, chirashizushi, temakizushi or whatever other zushi you're planning to make, clean and dry your hangiri properly so that you can use it again another day!
Like this Page?
|
|
Follow me on Pinterest




New! Comments
Have your say about what you just read! Leave me a comment in the box below.